Nearly everyone who has ever owned a car has experienced that inevitable moment while driving on the interstate, traveling along at 65mph and noticing a new and strange humming noise, accompanied by a very slight vibration that is felt in the steering wheel. This scenario could describe a number of possible mechanical needs: the tires are overdue for rotation, one tire has worn down differently from the other three, maybe an alignment issue, or it could be an issue with the CV joint or wheel bearing. Learning how to diagnose a wheel bearing or CV joint vibration and humming noise isn’t too hard; if you’re somewhat mechanically inclined and have the tools needed to remove your wheel and unbolt your brake calipers, you can diagnose wheel bearing issues as well as change them. Below, we’ll cover the steps to diagnose wheel bearing noise, and go over how to change the front wheel bearing on a Dodge Ram 1500.
What’s That Noise? How to Diagnose Wheel Bearing or CV Joint Vibration Humming Noise
We’ll go through how to diagnose whether the wheel bearing or CV joint may be on its way out, but before we begin, make sure you’ve done the simple stuff first: how old is your differential and transfer case fluid? If they’re overdue for service, it doesn’t hurt to change the fluids and see if the problem resolves itself with regular, planned maintenance.
If it’s still making noise and you’ve confirmed the transfer and differential fluids are all in order, then we’ll need to pinpoint the root cause of the noise and vibration. When you hear the noise and feel the vibration, make a mental note: does it happen more when turning to the left, or when turning to the right? This will help pinpoint what side to focus on – if it makes more noise when turning left, this means the right side of the vehicle is experiencing more weight and load and should be inspected first. The same rules apply in reverse, so if it makes more noise when turning right, you will know to check the left side.
Next, we’ll walk through how to inspect the wheel on your Dodge Ram to see what the culprit of the noise and vibration is. Begin this process by jacking your truck off the ground and support the front end using stable jack stands; while it can make it easier having the entire axle off the ground, you technically only need to jack up and support the side you are working on.
Once the wheel is off the ground:
- Grab the wheel, and spin it to make sure that the particular axle and side is the root cause of the noise. If it’s not, then jack up the other wheel on the same side and spin that wheel to see if the noise is heard.

- After you verify which wheel is making noise, grab that wheel and try to shake and pull it from the 3 and 9 o’clock positions to see if there is any play in the wheel. If so, the bearing has likely gone bad on that axle.

- If the wheel felt stable on the shake test, visually inspect the CV joints on both sides to make sure there is no seepage or cracked boots that would indicate a CV failure. (You’ll also know whether it’s a CV joint issue if there is a clicking noise while driving when turning the wheel.)
- If the CV joints appear okay, the next step is to access the bearing. Unbolt the wheel at the lugs, remove the wheel, and then proceed with removing the brake caliper assembly. Once all are removed, you should have access to the wheel bearing. You can spin the bearing with your hand to see if the noise is more apparent; this should also eliminate whether it’s a CV joint vibration and humming noise.


How to Change Front Wheel Bearing on Dodge Ram 1500
Now that the noisemaker has been found, it’s time to replace the offending front wheel bearing. Here is a high-level overview of how to change a front wheel bearing on your Dodge Ram.
• Begin by jacking up the truck with the axle you will be working on, and lifted off the ground. Support the truck using jack stands throughout this process.
• Remove the wheel by loosening and removing the lug nuts, and then wiggling the wheel off of the bolts. Set the wheel aside.
• Remove the front brake caliper assembly: there are two 13mm bolts on the caliper, and two R21 on the back of the assembly. Unscrew each of the 13mm bolts and place the bolts aside. Before removing anything else, disconnect the ABS wire; it is held together by a clip.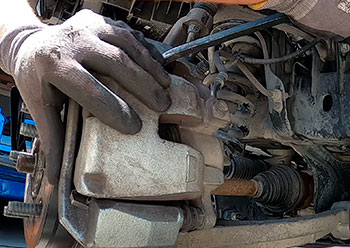
• Take a pry bar, and use it to press the brake pads against the pistons. Insert it into the two open spaces on the back of the caliper assembly and then wedge it so the brake pads are retracted. Once the pads are loose, remove the unit and place it somewhere safely (do not let it dangle by the brake line!).
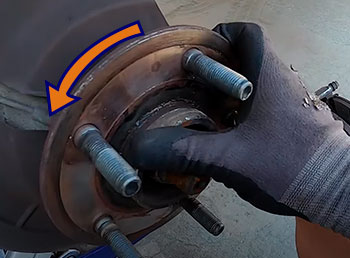
• Unscrew the two R21 bolts and set aside. You should now be able to remove the bracket and rotor from the axle; remove these, and set aside.
• Remove the old ABS sensor by unclipping it at the harness near the fender liner, and then un-clip it from the remainder of the axle by using a flat screwdriver to pry the arms open at each clip (there are two). Set the ABS sensor aside for when you install the new bearings; if your replacement bearings shipped with a new ABS sensor, you can use the new one instead.
• Remove the nut in the middle of the axle; this is accomplished by using a 36mm socket paired with an impact wrench. Set the nut aside, and then take a hammer or mallet and use it to tap the remaining axle that is showing through the bearing so it moves back in the housing.
• Loosen the bolt on the ball joint, but do not unscrew it completely; let it remain slightly threaded. Tap the metal part of the arm until it loosens; if the bolt is still threaded, it should simply pop loose, not fall completely apart. Once loose, remove the screw and pull the arm down to access the axle. There are three 21mm bolts on the back; unscrew each.
• Remove the bearing and heat shield. Give it a quick spin once it’s off the axle to make sure that it was, indeed, the noise maker.
• Take the new bearing, and thread it into the heat shield before mounting both onto the axle. Screw on the three 21mm bolts you just removed when you pulled the old bearing, and tighten them down to the correct torque spec.
• Reinstall the ball joint, and tighten down the 21mm bolt to torque spec.
• Replace the brake rotor, and reinstall the brake caliper bracket. Tighten down the two 21mm bolts on the back of the bracket.
• Replace the brake pads, and brake caliper. Screw on and tighten down the two 13mm bolts on the top.
• Screw on, and tighten down, the larger 36mm axle nut.
• Route the ABS wire (either the original, or the new one if your replacement bearing came with one) – it should plug and clip in at all the original mount and harness points. While completing this step, make sure your brake line is aligned properly.
• Replace the wheel, and secure the lug nuts.
If all goes well, you should be able to successfully diagnose a compromised wheel bearing, and have completed the replacement process; a quick test drive should confirm that the noise is no longer present while driving at highway speeds, and there should not be any further vibration that is felt.