The option for remote start has its upsides, as anyone who has ever lived in a less temperate climate can attest; being able to remote start your vehicle to cool it down on a summer afternoon, or warm your windshield on a freezing winter morning, makes your trip that much more enjoyable. Remote start technology dates back to the 1980’s, but became widely available within the last twenty years across a variety of manufacturers. Now, many Ford F-150’s have a remote start functionality that is accessible either by use of the key fob, or through a mobile app called FordPass.

If you’ve got a four-button fob for your F-150, then guess what, you’re in luck – one of those buttons most likely functions for the remote start feature, usually the one indicated with “2X” and an arrow looping around the text. Simply press the lock button once, and then press the remote start button twice, and your vehicle will start. You will also see a visual confirmation as the headlights flash when the vehicle starts.
For everyone else – those with a three-button fob, and those who purchased their F-150 used and aren’t quite sure if the feature is there – read on for instructions on how to tell if your Ford F-150 has remote start, and how to use your phone to remote start using FordPass.
How to Tell If Your F-150 Has Remote Start with a Three-Button Fob
If you’ve got a three-button fob, it’s possible that your vehicle still has the remote start feature, but it was manufactured and sold without a specific fourth button on the key fob for the remote start feature. The easiest way to test whether you have the remote start option is to press the lock button, then the unlock button, then the lock button again consecutively. If your vehicle has the three-button remote start option, following these steps should work to remote start your F-150.
If it does not work, then it’s likely that the module does not exist in your vehicle. The remote start feature can be set up by upgrading to a four-button fob and module setup; more on this below, but before we unpack how to make the upgrade, let’s explore how you can use the FordPass app to remote start your F-150 if you’ve discovered your vehicle does, in fact, have the remote start option.
How to Use Your Phone to Remote Start Your F-150 Using FordPass
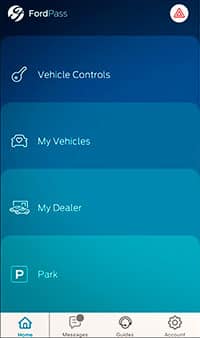
Since there isn’t always a separate button on the key fob for remote start, some Ford owners prefer to use the FordPass app on their phones to activate the remote start feature. On your mobile device, head to the app store and search for the FordPass app to download it to your device. Once the download is complete, open the app, and follow the “Create Account” option to set up your account and enter your information. The next screen will prompt you to enter your vehicle; you will need to enter or scan your vehicle’s VIN number here for it to populate. This should add your vehicle to the app and ask whether you would like to activate (4G connection is required). After activating, it may take about 24 hours for Ford to verify the vehicle and account data you provided during setup before the app becomes fully functional.
While some people prefer the convenience of having the remote start feature accessible on the key fob, the cool part about using FordPass is that there isn’t a limit on the range that the user has to be in proximity to the vehicle – in other words, since it’s not a standard two-way system, you could be two states over (or even on a different continent) and it would still work to start the vehicle. This app also works to lock and unlock the vehicle, track using GPS, and even provide insight on your fuel level and tire pressure as well as alert you if it detects that it’s due for an oil change or service interval.
Overview of How to Upgrade Your Vehicle to Include Remote Start
The option to add remote start can also be accomplished by purchasing two new four-button key fobs which will contain a separate button needed for remote start, in addition to a four-button Remote Transceiver Module (or RTM) to install. It should be noted that each of the three-button and four-button RTMs will function on a different frequency, so a three-button module may not work with a four-button fob, and vice versa; this means that if you’re hoping to pick up a four-button RTM and use it with your three-button fob, it will most likely be incompatible. The part number for the appropriate 4-button key fob is 164-R8134, and the part number for the Remote Transceiver Module is F2GZ-15607-C. Both parts operate at 902 MHz.
If your goal is to save on costs and avoid paying for the dealer to program the new remotes, both of these processes will require a somewhat comfortable working knowledge of the FORScan program to do this; if this is your first time dabbling in FORScan functionality, follow the instructions carefully.
One last required item you’ll need: two programmed working keys to the vehicle, as these will be needed when programming the new keys. If you do not have two programmed keys, you will need to obtain a second programmed key before being able to complete this upgrade.
Backing Up the Module Listing Using FORScan
You’ll need to save the module listing using FORScan. Open the FORScan app and open the module listing “RTM (AS BUILT).” Once in the module, click Save All in the bottom left corner of the screen. An explorer window will appear asking you for the save info; you can name it anything you choose, but make sure to save it as a .abt file type.
Removing and Installing the New Remote Transceiver Module
Next step is to remove the old Remote Transceiver Module, and install the new one. Begin by removing the C-pillar trim above the rear window on the passenger side, then pull some of the upper portion of the door seal off so you can then move the headliner down and out of the way. You’ll see the old module plugged in; go ahead and unplug the module, pull it out, and then plug the new one in. Leave the seal and trim hanging out as-is, until you’ve confirmed the module is good to go.
Applying the Old Module Listing to the New Module, Using FORScan
Next step is to restore the previous module info to the new module that you just plugged in. Open up FORScan, and open up the module listing “RTM (AS BUILT).” On the bottom left of the screen, click “Load All,” and this should open up the folder for where you saved your previous module file from earlier. Select the file to load it; you may or may not see a confirmation box indicating that this has been completed, but if one appears, click “OK” to proceed. Next, go back to the bottom of the screen and click “Write All,” and follow the prompts on the screen.
Programming the New Four-Button Key Fobs
The new keys will all need to be cut; this can be done at a dealer or a locksmith, but it may be worth calling around to see if a local dealer can save you some money and cut the keys for free.
Take the two working keys to the vehicle. Insert the first into the ignition and turn to the “On” position (do not start the vehicle), allow the vehicle to ding twice, then turn the key back to the “Off” position and remove it from the ignition. Repeat these steps using the second working key; do not start the vehicle. Once the second key is out of the ignition, take the third key and insert it into the ignition and turn it to the “On” position, and wait for it to ding twice; after the second ding, you should hear the locks actuate, which is your indicator that the programming was successful. You can also confirm by removing the newly programmed key from the ignition, then re-insert it and start the vehicle.
If this does not work: insert the first original key, and then cycle it from “Off” to “On” (not start) eight times in a row and then remove the key. Take the second key, and cycle it from “Off” to “On” two times, and remove the key from the ignition. Insert the new key, turn it to the “On” position, and leave it until the dash displays confirmation that the key is programmed, or the locks actuate. Remove the key, and verify all functions work – it starts the vehicle, and locks and unlocks the doors.
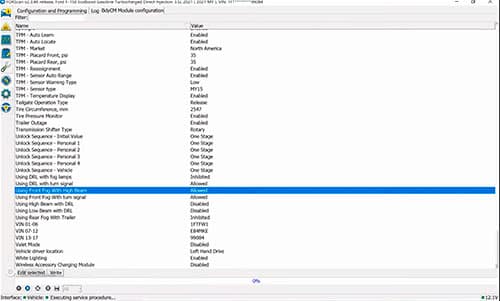
Activate the Remote Start Function in FORScan
This step requires you to change a line of code in the BCM. Open the FORScan app and navigate to the BCM module. Find and change the line “726-22-02-###1-####-####” – the fourth digit in the sequence of numbers identified by the # icon must be a 1. You will change this from a “0” to a “1”, then click “Write All” in the bottom left side of the screen and follow the prompts. Verify the remote start functionality is now working on your key fob, along with the remaining lock/unlock and panic button features.
Re-Learning TPMS
The final step needed is to relearn the TPMS. Insert your key into the ignition and turn it to the “On” position, and then activate your hazard light six times; after the sixth time, your horn will honk and the dash screen will indicate “Train Left Front Tire.” Exit the vehicle, remove the cap for your left front tire, and depress the valve to let air out; continue letting air out until the vehicle honks, and then stop and replace the cap. Verify the dash screen says to train the right front tire, and repeat the process to let air out of the right front tire until the vehicle honks. Repeat this process for the remaining two tires following the order indicated on your dash. After the final tire is finished, the system is re-learned; refer to the driver door sticker for proper PSI levels, and re-inflate all four tires back to specification.
Put it All Back Together… and enjoy!
After you have verified the new key fobs work, the remote start functionality is intact, and the TPMS is re-learned, you can reinstall the C-pillar and door trim that you removed to install the RTM.
Once you’ve confirmed that your vehicle has remote start, or you’ve completed the install and programming of the new module and key fobs, the next step is to customize what features activate when you remote start your vehicle. With the vehicle running, navigate on the information display on your dash screen to “Settings,” then “Advanced Settings,” select “Vehicle,” and then “Remote Start.” In this screen, you can program specific settings such as how long the vehicle should remain running after it has been remotely started, what climate control settings you desire, and what memory program you want activated. This will help you maximize your use and experience with the remote start feature on your F-150.